Track and Monitor Document Status and Workflow

One of the biggest benefits of electronic signature platforms is the ability for you, the document sender, to check and monitor the status and history of any document that is in progress. Having a document status tracker is so important in finding bottlenecks to the signing process and knowing exactly who to contact to sign documents.
The status options are divided between the Recipient Status and the Document History. To access these pages, you’ll need to go to the Documents page first, using the navigator bar seen on the dashboard. Select the Documents icon to be redirected. Find the document you want to monitor.

Document Status by Recipients

Clicking on the name of the recipients will automatically take you to the Recipient List page, where you can see the status of each signer, and the ability to change signers or resend the invitation email. The status of the signer is listed, so you can know where they are in the workflow and find any major bottlenecks.
document status checking recipient status
As you can see, you can see the status of each signer and what their role and what kind of authentication factors they have.
document status and checking the status of signers

The Document History

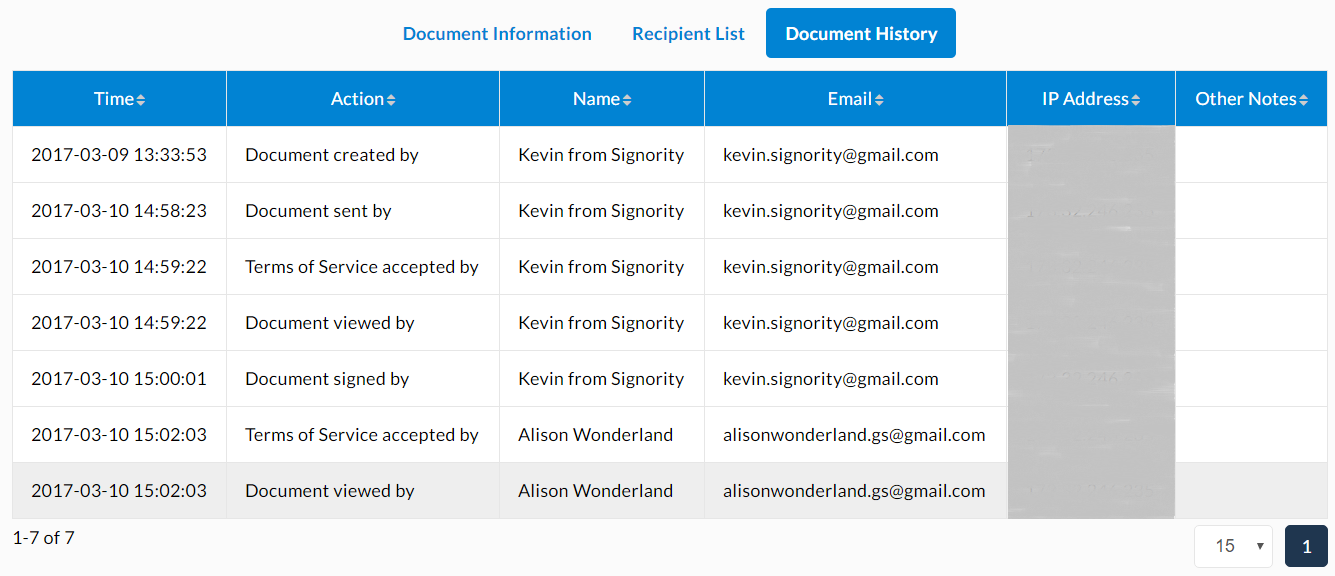
If you’d like more detail beyond the fact that a document is In Progress (understandable!) click on the status or from the Recipient List page, click on the Document History tab to be shown the history of the document.
document status checking document history
The detailed document history page will display:


Note: the information listed in the document history page will be added to the completed document PDF as an audit trail.

Further Readings

Creating and Managing a Document Deadline
Setting Notification Reminder and Deadline Options for New Documents
Whitepaper: The Benefits of eSignature

Sign Documents Online as Recipients

Signority makes it easy to sign documents online as a recipient, simplifying the signing process to be as seamless and easy as possible!
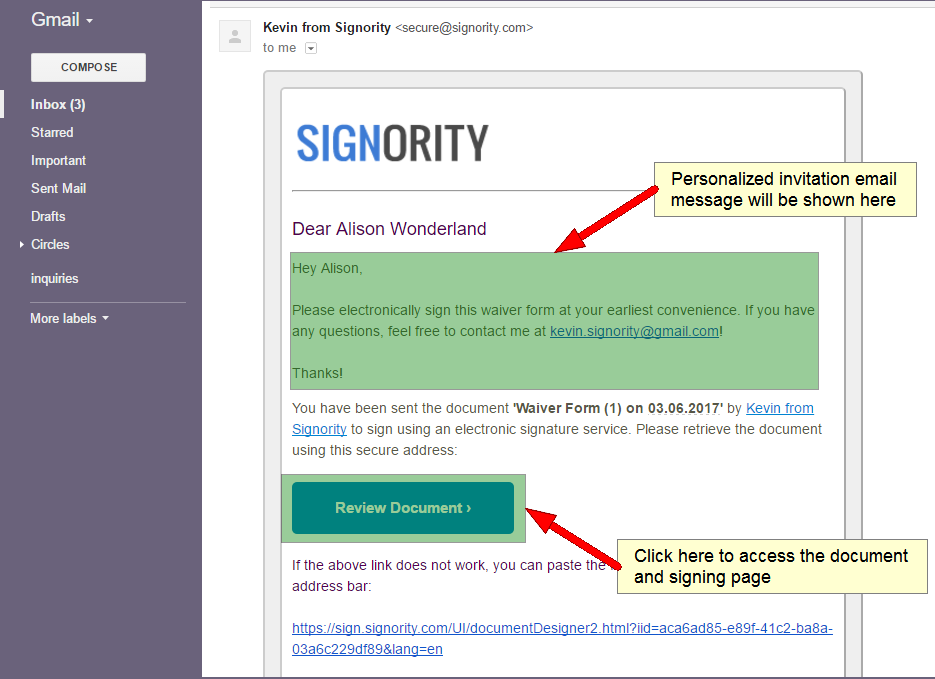
With all our workflows, whenever a Signority user sends someone a document to sign electronically, they will receive an invitation email. When you get the email, just click on the Review Document button to be re-directed to the signing page.
invitation for electronically signing document as a recipient

Step by Step to Sign Documents Online as a Signer

  1. Accept the Terms of Service so you can access the document.
  2. Once you’re on the document signing page, use the Using the Next button, navigate through the document button to navigate through the document.
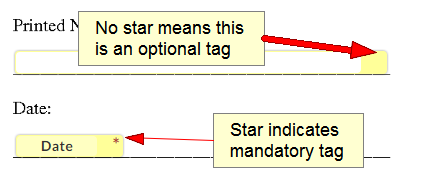
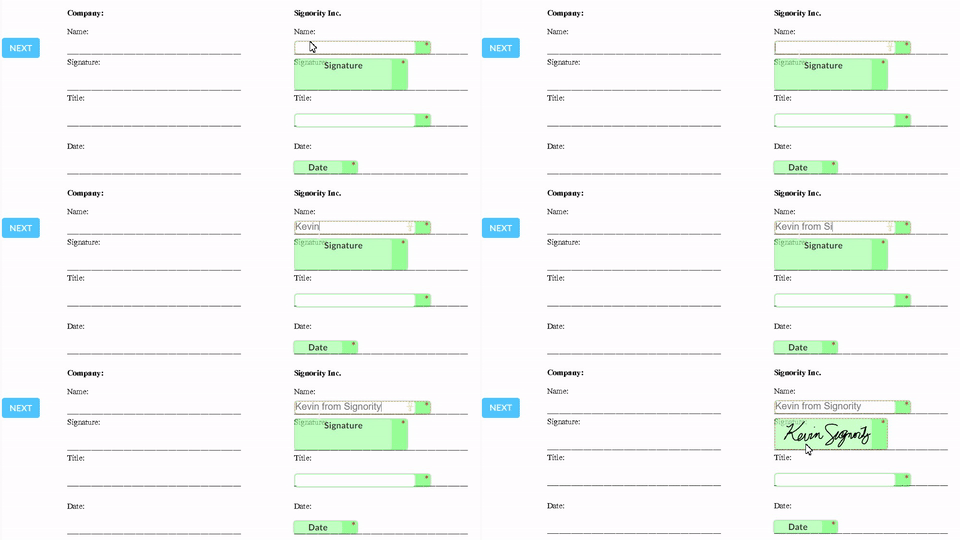
  3. Enter your information in the tags you see. Any tags with a red start indicate that they’re mandatory and must be filled. You will not be able to complete and submit the document without filling in ALL mandatory tags!

the difference between optional and mandatory tags when you sign documents online

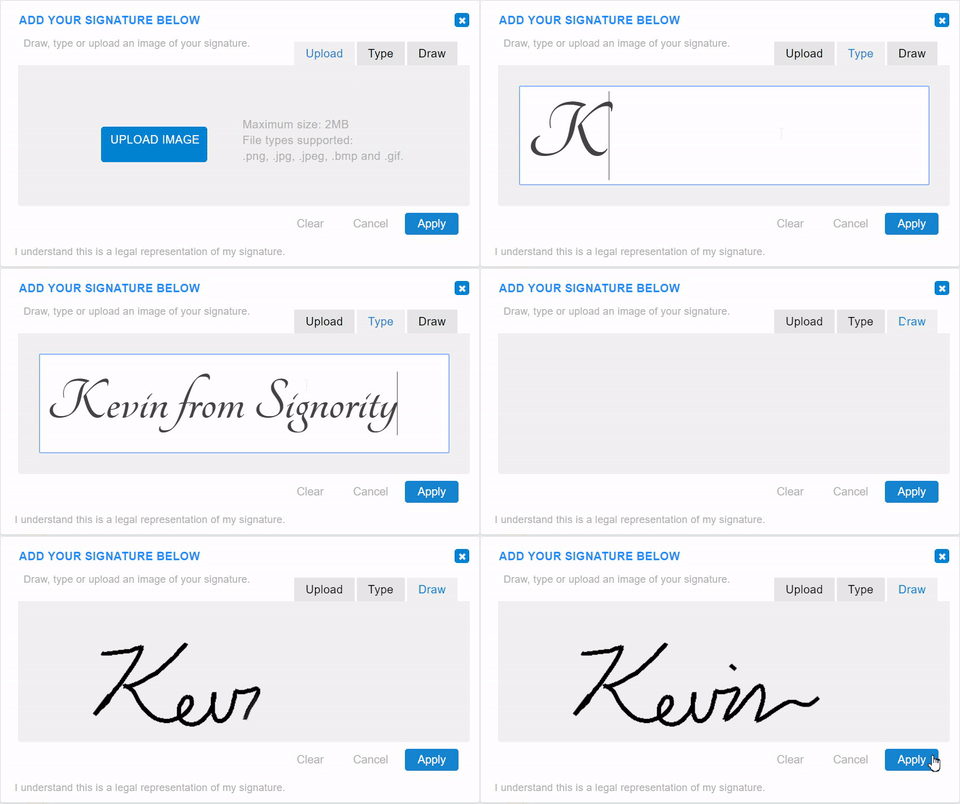
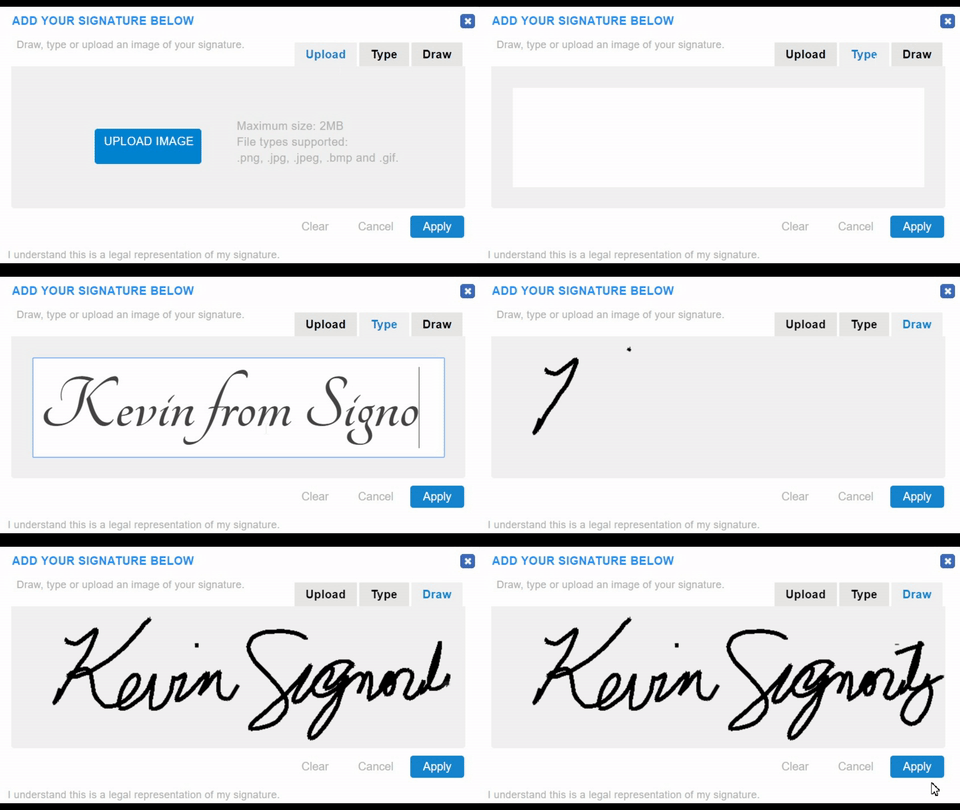
  1. Continue through the document. When you get to the signature tag, you’ll have a few options:
    • Draw your signature using a touch pad/screen or using a mouse
    • Type your signature with a keyboard
    • Upload a scanned copy or picture of your signature from your computer or phone

How to use the signature tags for upload, type, or draw

  1. Once you’re finished filling in all of the information, review the information and “Submit” the document. And just like that, you can sign documents online with minimum effort and requires no scanning or emailing! 

Once the document is finalized by all of the signers, you will be notified via email with an attached copy of the finalized document for safe keeping.
Want to learn how to create electronic signature documents for others? Start collecting your own electronic signatures today!

Further Readings

Electronically Signing Documents for Yourself
Rejecting Documents as a Signer
Switching Signer Responsibilities to Another Person

Electronically Signing a Document for Yourself

Electronically signing a document for yourself is a simple and easy process with Signority. It’s similar to when you would create electronic signature documents for others, but with a few less steps to simplify the process even further. To get started, use the +New button and select the New Document option.

Step by Step to Electronically Signing Documents for Yourself

  1. On the Upload page, use the Upload a document for electronic signature button to bring up the browser and search your computer for the document you want to electronically sign. When you’re finished, go to the Next step.
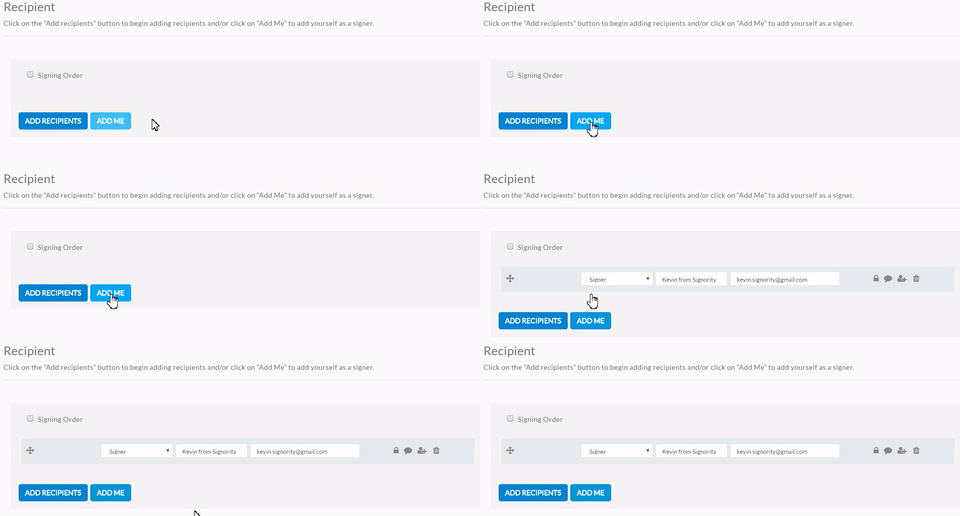
  2. Once you’ve uploaded the document, you’ll need to add yourself as a signer on the Recipients page. Use the Add yourself in the workflow to add your own electronic signature button to add yourself as the only signer.

how to add yourself for electronically signing documents

  1. After adding yourself, disregard the rest of the Recipients page. You do not need to customize a message or set a reminder schedule because you are the only signer and you will be re-directed directly to the signing page. When you’re ready, go to the Next step.
  2. Now, since you’re the only signer, rather than being directed to the Editor page like you normally would, you go straight to the signing page.
  3. Drag and drop the tags into place and fill it in immediately as you go (this is where things differ from the normal document creation workflow)

Add a text tag and fill it in as you go

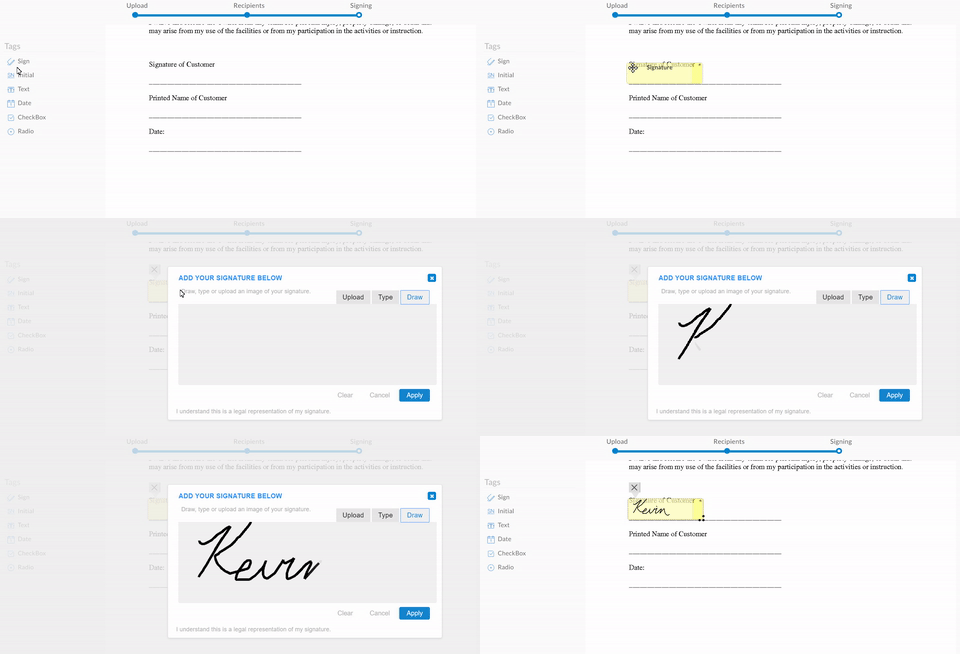
  1. Add the signature tag then click on it to bring up the signing box. You can draw, type, or upload your signature. Once you’ve added all the tags and have filled them in, click on Finished in the top right and the document will be finalized.

electronically signing a signature tag for yourself
You will receive an email with the final copy or you can download it directly from your Documents page.

And voilà! Electronically signing a document for yourself is a simple process with Signority’s easy-to-use eSignature solution!
Need other signatures? Check out our help page on creating electronic signature documents for others here.

Further Readings

Creating and Using Templates for Electronic Signature Documents
Creating Your Default Signature Design for One-Touch Signing
Overview of Tags

Notification Reminder and Deadlines Options for New Documents

When you’re sending out a document, Signority can automate notification reminder emails to signers and send you email updates on the status of a document. You can always set your default automatic reminders and notifications from your Account Settings but there may be times when you need to set specific settings for individual documents.

Customizing Notification Reminder Settings for New Documents

Begin by creating a New Document using the +New button. The process is the same as creating electronic signature documents but with a few minor differences.

  1. Upload a document you need signed
  2. Add Recipients and specify their names and emails. Customize the Invitation Email and Document Settings.
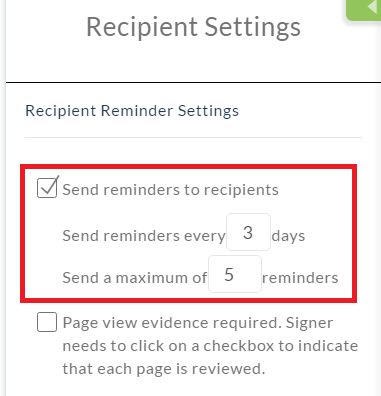
  3. In the Recipient Reminder Settings, you can start by setting your notification reminders schedule.

Change Notification Reminder Schedule from Recipient Settings Page

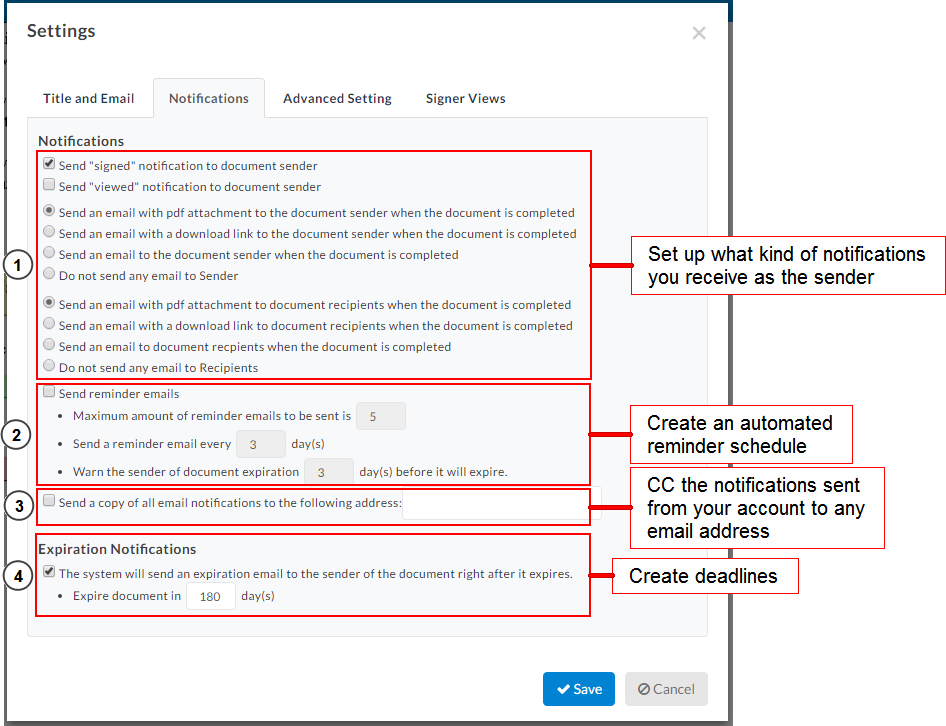
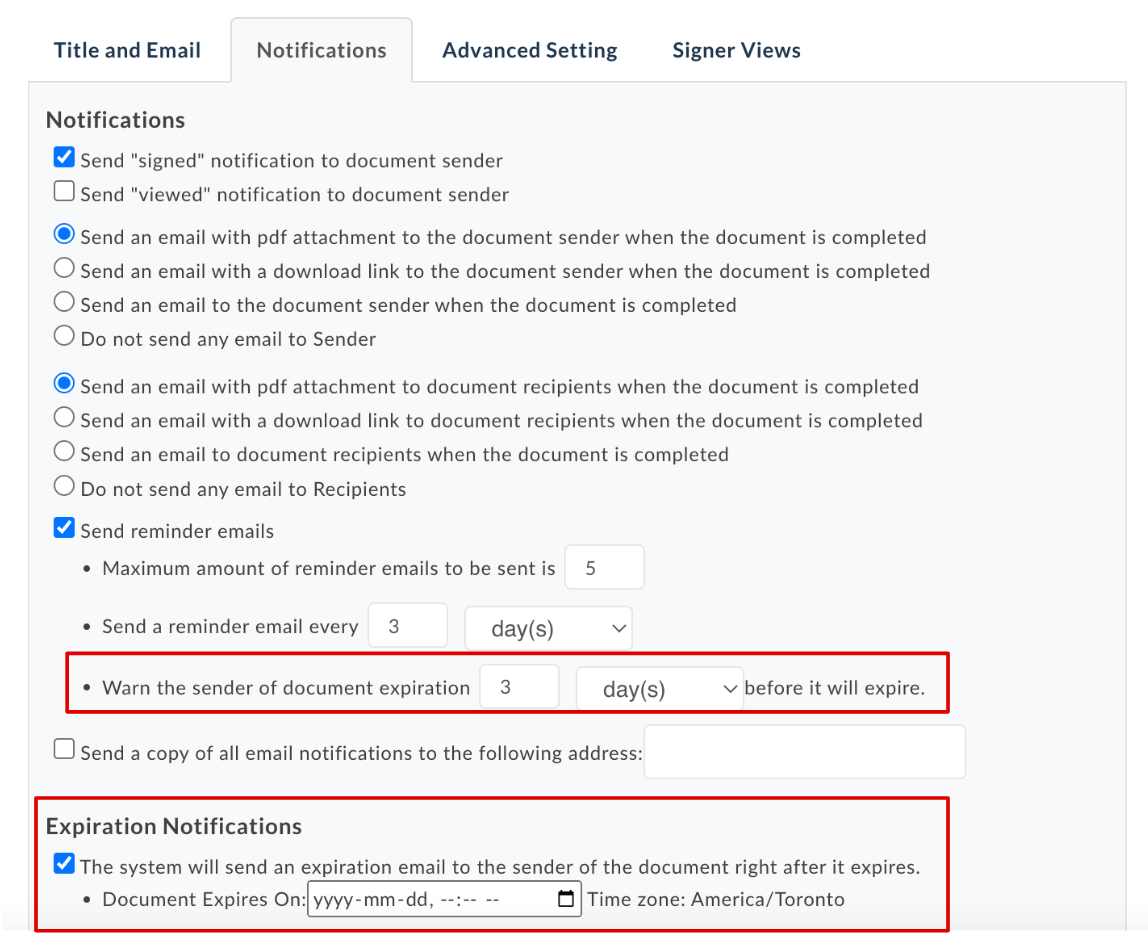
  1. In the next step on the Editor page, go to the Settings next to the Document Title in the top left. Go to the Notifications tab.

Editing Notification Reminder Options for New Documents

  1. When you’re done, click Save and add Tags to the document before sending it out for signature.

Overview of Options for Notification Reminders

In the first section, you can set what kind of notifications you wish to receive. Get notified for the following:

  • When a document is opened and viewed by a signer
  • When a document is signed by a signer
  • What’s included in the finalized email

In the next section, set up your automatic reminder schedule. Specify the following:

  • How many reminder emails should be sent in total
  • How frequent those reminder emails should be sent
  • When to warn signers about the document deadline

In the third section, you can copy all notification reminder emails to a specified email address of your choice. This lets you record all the interactions with your signers.
And in the final section of the Notification Settings, create a document deadline and specify how long the document is valid for.
Signority sends reminder emails to recipients every few days until they’ve signed the document or they’ve been reminded the maximum amount of times. If the document is completed, they will also stop receiving emails for the document as well.
Most documents sent through Signority are signed within hours or a few days of being sent, but just in case there’s a little delay, it’s always safe to set some reminders & deadlines.

Further reading

Track and Monitor Document Status & Workflow
Change Signers and Resending Invitation Emails
Benefits of eSignature

Publishing Template Links for Online Signing

Signority’s Template Links help expedite applications by making forms available online. Creating and publishing Template Links will generate an URL link that can then be used anywhere online – in emails or on your website.

Creating new Template Links

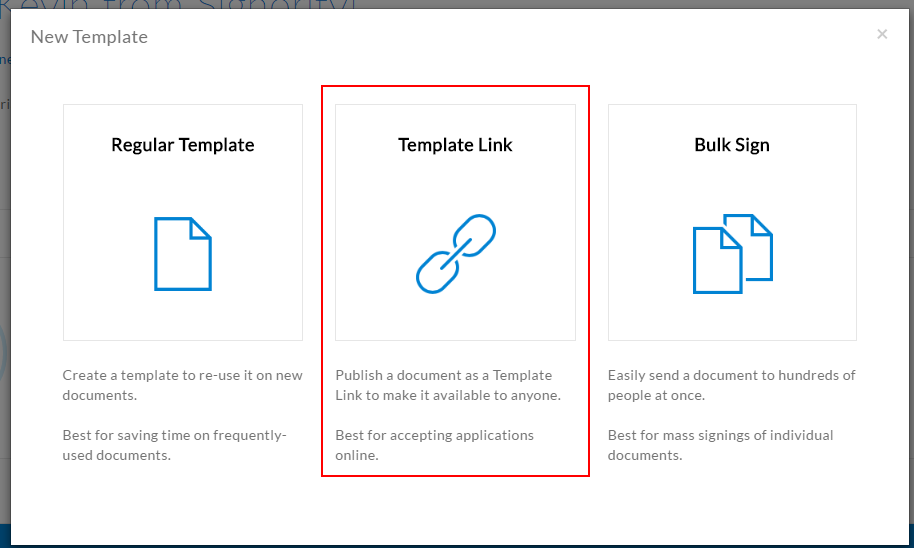
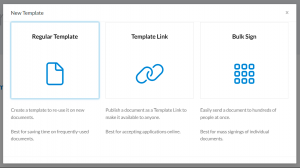
To create a Template Link, click +New and then New Template. When prompted, select the Template Link option.


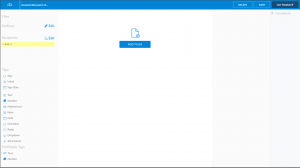
You’ll be redirected to the Editor page, same as when creating a template. As with a Regular Template, you’ll need to Add Files to create the document. When it’s successfully uploaded, the document should be visible on the editor.
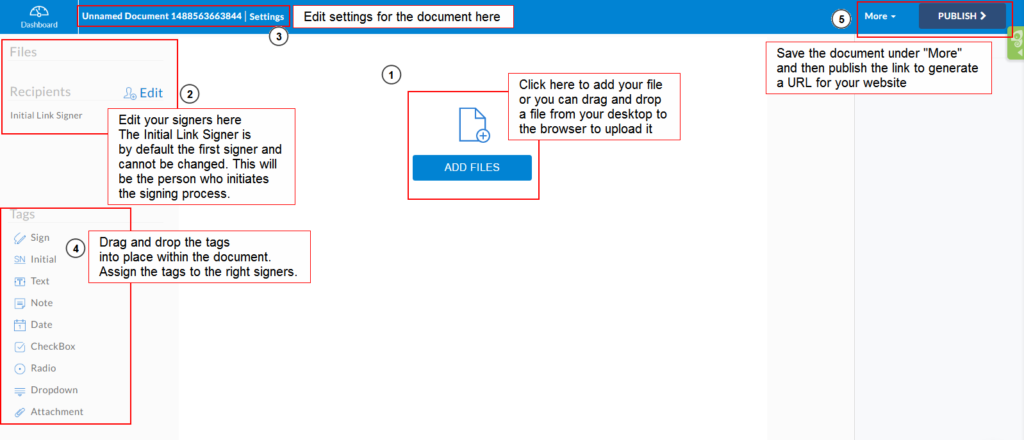
Template link editor page with annotations
Unlike with a Regular Template, instead of Roles or Signers, you’ll notice that the first signer is already designated as the Initial Link Signer. This is the person who clicks on the generated URL to access the document and initiates the signing process. Also, when adding other signers, you can set them as either a Person or a Placeholder. As shown below, a Person is a specific signer, with their name and email. A Placeholder is a signer that only the initial link signer knows. So for example, if you, as the template link creator, does not know the signer’s manager information, you can make the Manager a Placeholder and let the Initial Link Signer enter their own manager’s name and email to continue the workflow.
the difference between a signer and a placeholder
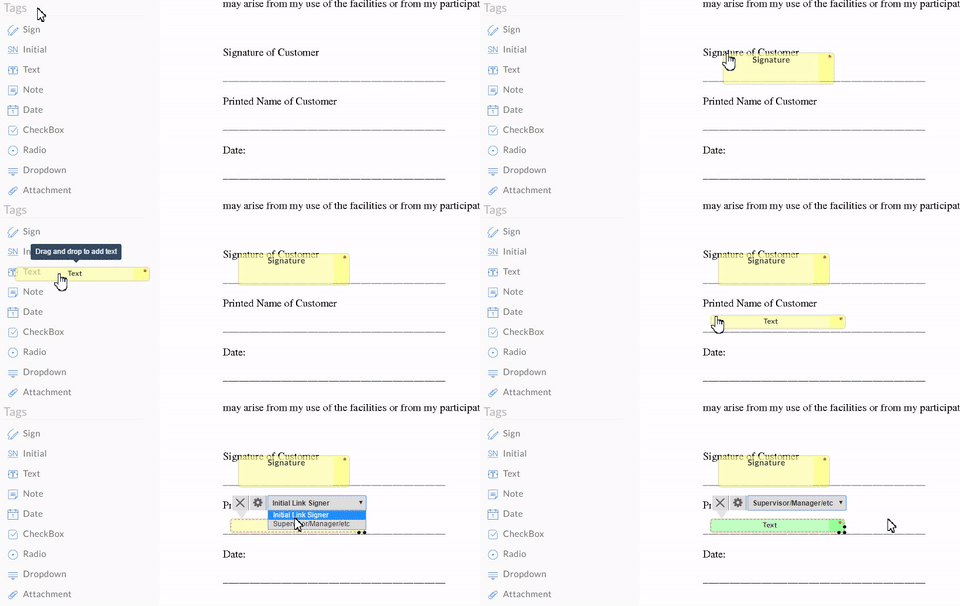
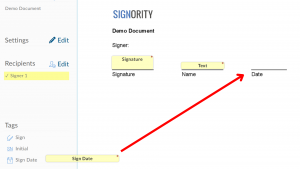
When you’re done with the recipients, you can edit some of the document settings as well in the Settings button in the top. Finally, when you’re finished with the setup, drag and drop the needed tags and assign them to the right signers.
adding and assigning tags in published template links
When you’re done tagging the document, click More to Save File before clicking on Publish to generate the URL.

Save your template link before publishingpublish the template link to generate URL

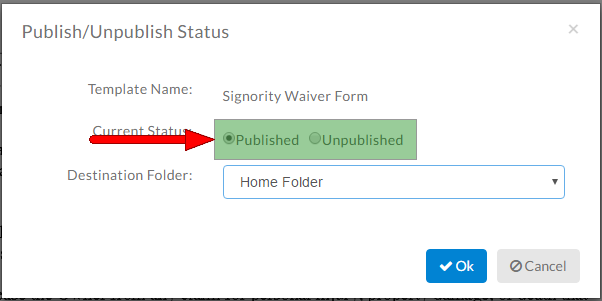
Once you’ve clicked Publish, you’ll get a pop-up to change the Current Status of the link. Make sure it’s set to Published and then click OK.
change the status of the template link to be published
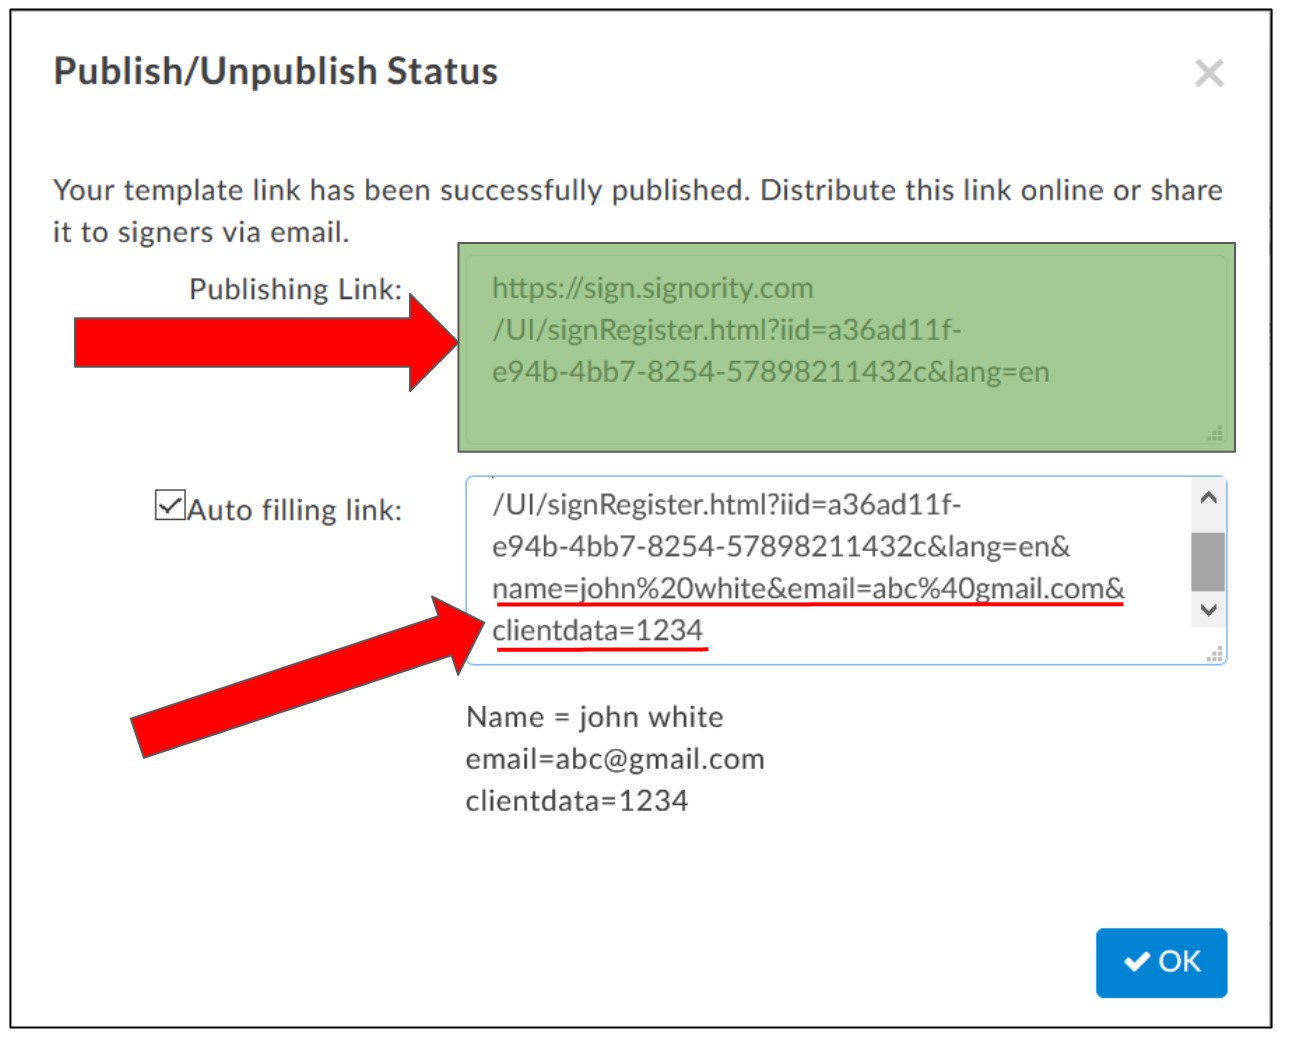
Then copy the Publishing Link and use that URL to embed to your website or emails. If you are sending the link to a specific person, you can use an Auto filling link. This option allows you to automatically populate the signer’s information into the form so that they don’t need to fill it out after clicking on your link.


And that’s it, with your Publishing Link URL, there are a ton of things you can do with it, such as streamline your employee onboarding, embedding the form into an iFrame on your website, or just simply collect simple forms, like liability and waiver forms.
For more details, check out the video below!

For further reading
Bulk Send Documents for Signing
Customizing Company Branding Settings
Notification Reminder and Deadline Options for New Documents

Creating a Regular Template

Regular templates are pre-prepared documents that can be sent to signers whenever needed. Best for saving time on frequently-used documents.

Create a New Regular Template

  1. In Signority, on the top header, click +New > New Template > Regular Template.

    Note: Unlike when you are creating a document, you will be brought directly to the Editor page to design the template.
  2. Upload your file by selecting the Add Files button in the middle of the document editor.
  3. Adjust settings for the document by clicking Edit next to ‘Settings’ on the left panel. A pop-up will appear where you can customize the settings for the template. Some of the settings you can define are:
    • Title and Email: Customize the name for the template and customize the email settings.
    • Notifications: Modify the notifications for the template.
    • Advanced Settings: Enable page view evidence
    • Signer Views: Define what recipients are able to view.
      Note: Settings defined for a template will become the default settings for the document.
  4. Add recipients to your template by clicking on Edit next to ‘Recipients’ on the left panel. For regular templates, instead of adding the signer’s name and email like you would with a document, you can define a recipient role, such as ‘Client’, ‘Supervisor’, or ‘CEO’, so you know whose name and email will be assigned to that recipient when using the template. Their specific name and email can then be added when you use the template.
    Note: If you want signers to sign the document in a specific sequence, add a signing order.
  5. Add tags to your document and assign them to the correct role by selecting the tag and using the drop-down. Continue adding tags through the rest of the template.
  6. Once you’re done creating your template, review it to make sure everything is correct before either saving the template for later or using it right away.

You can access all of your templates by going to the templates page if you ever want to use or edit them.


Further Readings

Track and Monitor Document Status & Workflow
Publishing Template Links for Online Signing
Setting Up Documents with Witness Signers

Creating and Managing a Document Deadline

Part of what simplifies an eSignature workflow is the ability to set a document deadline and improve the odds of completing deals on time! This page gives you a step-by-step on how to set up a document deadline, as well as monitoring the deadlines as it reaches expiration.

Setting Up a Document Deadline

When you’re creating electronic signature documents, adding a document deadline is very simple. Begin by starting a New Document using the +New button in the Dashboard.
Begin by Uploading a document for signature, and then edit your Recipients. Set any Recipient settings you may want and edit your invitation email message.
Now, on the Editor page, click Settings in the top left next to the Document Title and go to the Notification page.
Edit Document Settings to set Document Deadline
Here, you can set reminder emails, what the final email looks like, copy someone for all the notification emails, and most importantly (for this article), set Document Deadlines. Make sure you also indicate when to warn the signer of the expiration.


By default, documents in Signority expire after 180 days, but you can change this as well. You can learn how to change the default expiration and automatic reminder schedule here.

Monitoring a Document Deadline

After you send out a document, you can view documents that will soon expire in the Document page. Click on the Status header and filter by Documents Expiring Within a Week. Documents shown will be listed as In Progress.
We strongly recommend resending documents and making sure you sent it to the right email if it ever gets to that point. You can also directly contact the signers to remind them in case the automatic reminders are being ignored or lost.

Further Readings

Creating Your Default Signature Design
Customizing Company Branding Settings
Using Page View Evidence for Sensitive Documents

Documents for In-Person Signing

Ever had a situation where the signer is coming to see you in person but still wanted to use electronic signatures? Or maybe they do not have an email? That’s no problem! This document will go over the steps to set up a document for in-person signing to cover for these scenarios!

Creating a Document for In-Person Signing

Begin by creating a new document as you normally would, by selecting the +New and selecting New Document. The major difference in the preparation work comes during the recipient page. Check out our page on creating electronic signature documents here to learn the other steps.
When you get the Recipient page, things will start to differ from the regular document creation process. Begin by adding a recipient (or yourself if you are going to host the in-person signing) using the Add Recipients button. For the person who will host the in-person signing process, change them from a Signer to a Signing Host using the drop-down menu for the roles. An extra icon of a house will appear.

set up your in person signing process
When you select the In-Person Signing option, a second row will appear below the signing host. Enter the In-Person Signer‘s name and email address. You will also want to authenticate these signers. Since the document is not sent through an email, adding an extra level of authentication allows you to validate the In-Person Signer even further.
Click on the lock icon next to the In-Person Signer, and when prompted, select the ID Authentication and specify the type of ID you want to use for validation, such as Driver’s License or Passport.
If you need to add more than one in-person signer, you can do so by clicking on the house icon again next to the signing host.
When you’re done, click Save
authenticate your in person signing by requesting ID information

With the recipient list set, finish up any recipient settings you might want and then move to the next step. On the Editor page, drag and drop the tags from the left into place within the document. Assign the tags to the correct signer by clicking on a tag and using the drop down menu to change the recipient. Tags assigned to the in-person signer will have a house icon.
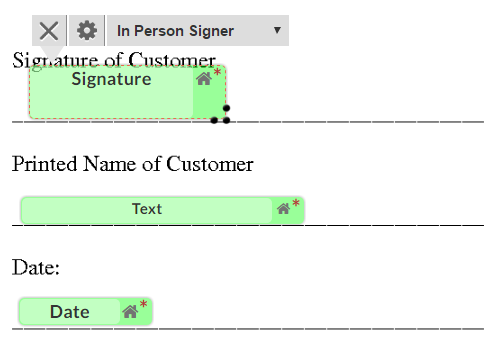
assigning tags for in-person signing
When you’re finished, click Next to finish preparing the document. When it’s time to sign, go to your email and open the invitation email to access the signing page or access the document from your Inbox from the dashboard in the Navigator bar.
Alternatively, you can publish a template link for online signing and save the link in your browser.

Hosting the In-Person Signing

When it’s time to sign a document with In-Person Signers, how you sign documents online is a bit different than for a normal document. The in-person signers will need to authenticate themselves in order to add their signature. The process is very similar to the witness signer authentication process.
The first thing signers should do is to fill out all the information except for the signature tag. When the remaining tags are filled, select the Signature tag to begin the authentication process.
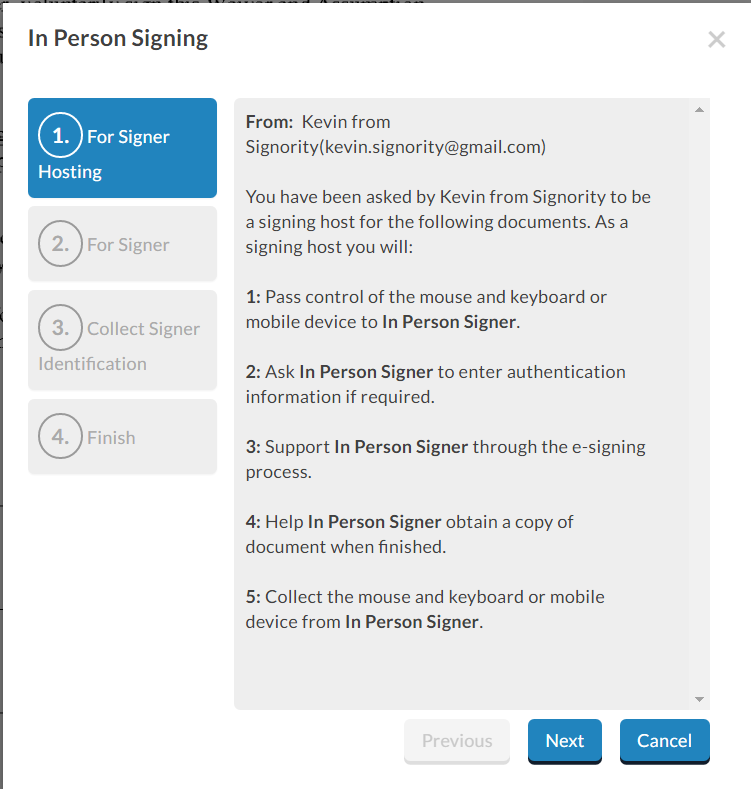
In-Person Signing Authentication Process
They’ll need to first acknowledge that they are doing an in-person signing and then agree to the terms of service. They’ll also need to put in their email to receive the finalized document. 
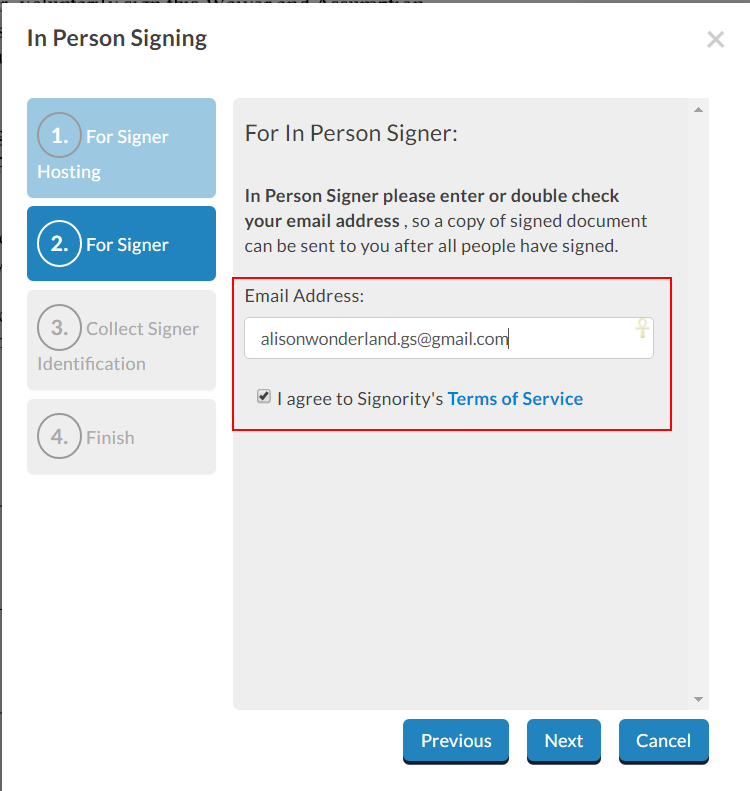
In-Person Signing Email Confirmation
If you’ve set up any ID authentication here, the in-person signer will need to enter the information of the specified ID. This information will be captured in the audit trail as a way of validating the in-person signer’s identity.
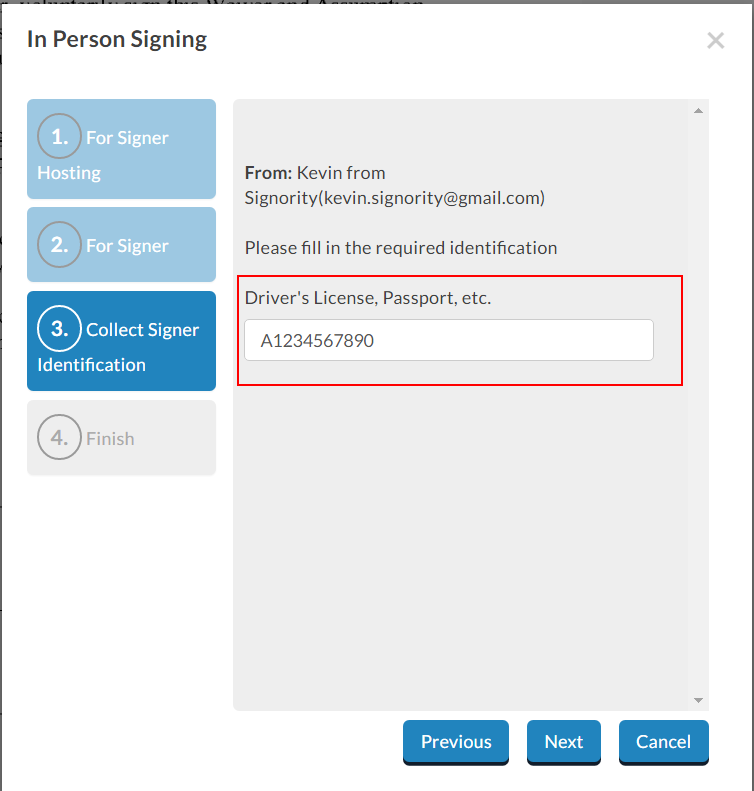
In-Person Signing ID Authentication
Once they’ve added their ID authentication details (if applicable), they can complete the authentication process. Simply click Finish when you arrive to the last step.
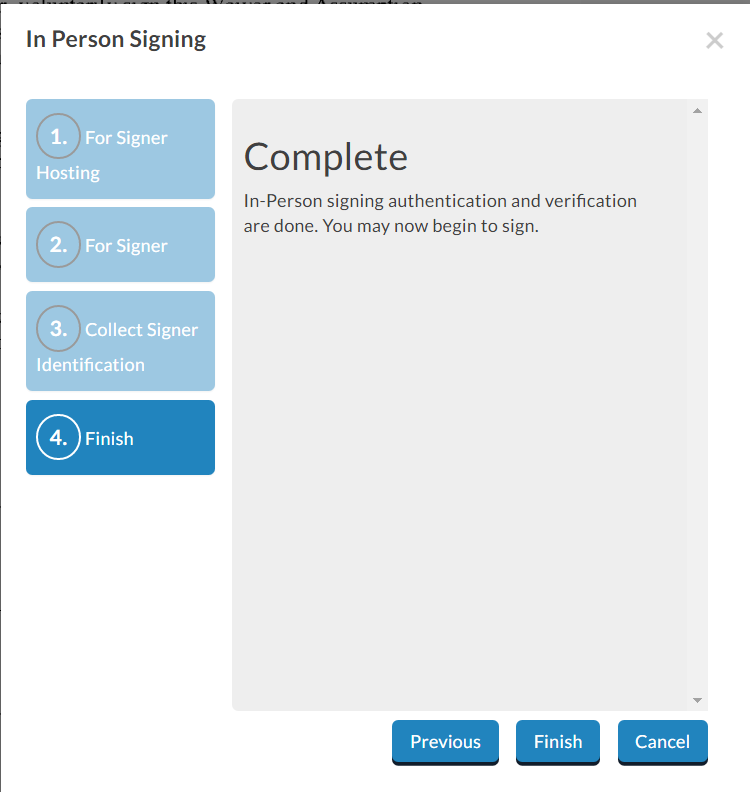
In-person signing authentication complete

When this is done, they will be able to sign and fill in the tags. Repeat this process for each of the in-person signers (if there are more than one) and then complete the rest of the document. Submit the document when it is completed. If there are other non-in-person signers, the document will be completed once all parties have submitted their portion.
The final document will be received by all signers, including the in-person signer, as well as the sender.

Further Readings

Setting Up Documents with Witness Signers
Electronic Signature Authentication using Email and SMS Authentication
Using Page View Evidence for Sensitive Documents