Predefining Stamps
Available with: Custom Plans
Stamps are a form of authentication used to convey official authorization or approval.
Predefining an Encrypted Stamp
Role(s): Team Admin, Super Admin
Super admins and team admins can predefine a stamp for a team(s)/user(s) so that they will have access to that stamp when signing a document.
- Navigate to the Admin Console.
- In the left side menu select Settings > Stamps.
- At the top right of the page, select the Add New button.
- On the pop-up, select Stamp.
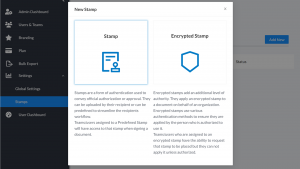
- Enter the following details:
-
- Name: Name of the electronic seal
- Upload Graphic: PNG or JPEG of the stamp
- Users/Teams: Select the users/teams that have access to that stamp when signing a document. You may select either an individual user or a team as a whole. When you select a team, the whole team will have access to that stamp.
Note: If you select a team, you do not have to select the individuals within the team.
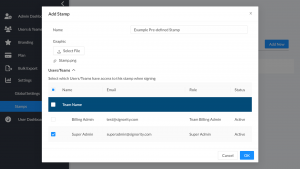
-
- Click OK when you are done.
The stamp will now appear on the Stamps page. To edit the stamp, click the pen icon button to the right of the stamp.
Adding a Stamp Tag as a Sender
Role(s): Sender
By default, recipients are able to a upload their own stamp to a stamp tag. You can change this on the document as is covered in this tutorial or you can change these default settings under Settings > Global Settings > Signer Options and toggle to set the default to enabled/disabled.
- Begin by creating a new document, then upload your documents or go straight to the add recipients page.
- Add the recipients for your document.
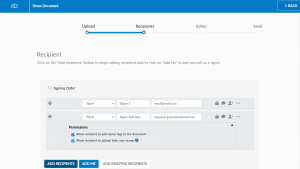
- [Optional] Enable/disable recipients from uploading their own stamp.
- To the right of the recipient, select the Elipsis > Recipient Permissions.
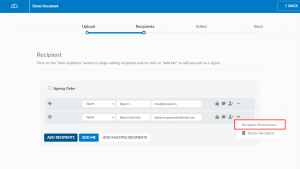
- Toggle the checkbox on or off.
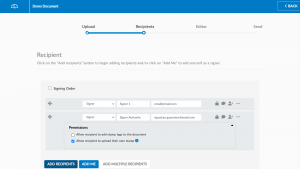
- To the right of the recipient, select the Elipsis > Recipient Permissions.
- Click next to proceed to the document editor page.
- Select the stamp recipient on the left menu, and the Encrypted Stamp tag will appear as an option under ‘Tags’ on the left menu.
- Drag and drop the stamp onto your document.

- Finish setting up your document and then click Send.
The email associated with the electronic seal will be sent an email when the document is ready for them to apply the seal.
Enable Signers to Add their Own Stamp Tag
Role(s): Sender
By default, recipients are not able to add their own stamp tag to the document. This tutorial covers how to change this on the document, however, you can change the default setting under Settings > Global Settings > Signer Options.
- Begin by creating a new document, then upload your documents or go straight to the add recipients page.
- Add the recipients for your document.
- To the right of the recipient, select the Elipsis > Recipient Permissions.

- Toggle the checkbox on or off.
Adding a Stamp Tag as a Signer
- Open the document for signature.
- Agree to the terms of use and click OK.
- Drag and drop from the Stamp Tag to the right of the document to place the stamp.
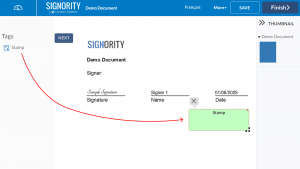
- Adjust the location and size of the stamp.
- Select the stamp tag to upload or select a predefined stamp to place on the document.
- Fill in any other tags assigned to you.
- Click Finish to complete the signing process.

